Sample rate setup - Windows
Posted 2016-05-22
Do you want to tune up your DAC for the maximum performance? Then you should have a look at how to set the sample rate of your DAC. This applies to all USB DACs, not just
the Henry Audio models.

Confused? No wonder. Digital music is stored at certain time intervals. The sample rate describes how often these time intervals occur. Modern computers are surprisingly prone
to changing that rate on your behalf. This used to be a very demanding task on the processor. But with today's chips it's a walk in the park. But that still doesn't mean you should let
your computer do it.
All CDs are recorded at 44100 samples per second. Hi-res music recordings can go much higher, typically to 96ksps or 192ksps (kilo samples per second). Here I show you how to force your
computer to use the original CD sample rate. Modern music streaming is based on a source which in almost all cases was a CD. So regardless of how you receive that music, playing it back
at the CD sample rate will make sense.
When a USB DAC is plugged in, the operating system asks it which sample rates it supports. After that the OS will basically take all music as it arrives from the player software and resample
it to the highest rate the DAC manages.
This may not sound like such a bad idea. But there are two fundamentally different families of sample rates. 44.1, 88.2 and 176.4ksps derive from the original CD. 48, 96 and 192ksps are
used in other equipment. When the DAT player was introduced, 48ksps was selected so that copying 44.1ksps CD material was going to be hard!
When a DAC is plugged in, it almost always presents one of the 48/96/192 rates as its highest rate. Then Windows will resample your 44.1ksps music to such a rate. The result is that more than
99% of the original samples in the music are slightly altered in order to be played back at a slightly different rate.
I can fill you in with a lot more math if you wish, but trust me on this: preventing the operating system from resampling your music will in give you a better experience of it!
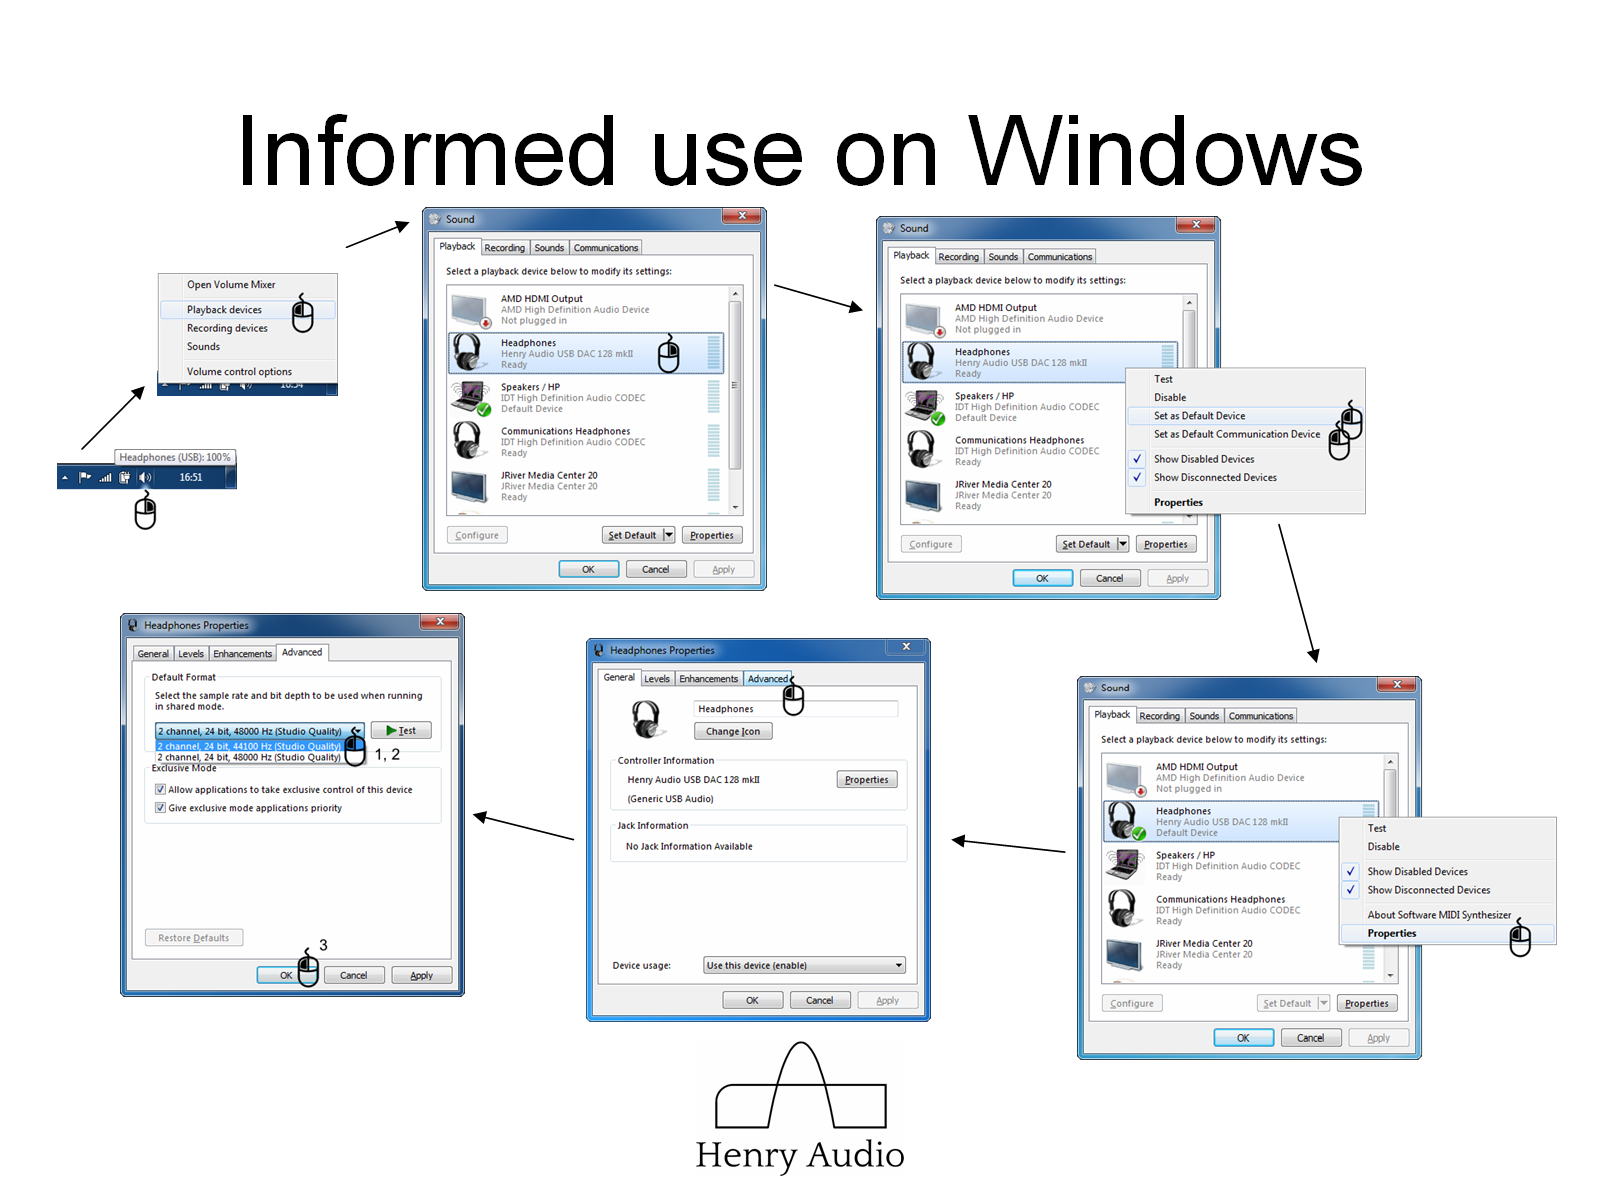
How is this done? It involves a pretty little dance of left and right clicks. I can talk you through it but your best option is to see it on picture.
Follow this link and look at the instructions.
This is a screen dump from slide 15 of the AES lecture I gave (see below).
Do all programs and all music benefit from setting a fixed sample rate? Well, I'd say 99% of them do. There are special cases when you have downloaded hi-res music where you want to use
a different sample rate from the original CD specification. But in that case you're probably using player software which does not trust the operating system to handle outgoing music. Such
software can be JRiver Medial Player or Foobar2000 with an ASIO driver. The built-in Windows WASAPI protocol also drops sample rate conversion.
Any feedback? Please use The Henry Audio Facebook page
DAC basics and OS setup presentation
Posted 2015-10-31
A little while ago I did a presentation for the Oslo chapter of the Audio Engineering Society (AES). Here's the presentation! It starts out with some D/A conversion basics and goes on to
show how to set up sample rates in various operating systems. A recommended read!

Any feedback? Please use The Henry Audio Facebook page
Ode to a Discman
Posted 2015-08-16
I'd like to tell you about an old and trusted companion, my D-NE700 Discman. It came out when the CD medium was at its peak. I can't help but be amazed at what Sony was able to cram into the little box.
The most obvious thing it does it of course to play CDs. It does that for very long time on a measly pair of AA batteries. Here you see it in all its glory:

This is a very well travelled Discman. When I worked in Nordic Semiconductor we used it to demo the wireless audio solution nRF24Z1. It did that well too. So here is a player which has earned its scratches.
While I haven't used the MP3 feature, what strikes me as the best thing about the Discman is actually its optical output. On the picture I have connected a 3.5mm TOSLINK cable to the same jack as used
for the headphones. Believe it or not, many years after it came out, this Discman has seen daily lab duty this summer during a software development project. (WM8805, more on that later.)
Those who know me know that I'm not much of a jogger. So I haven't tested the buffering and stabilization features of the Discman under natural conditions. But when another gadget
(Makita string trimmer) arrived I couldn't resist taking the D-NE700 along on the test. Neatly paired up with the closed Shure SRH940 headphones I decided to take the Makita for a walk. And I must say,
the little Sony didn't have a single hickup in its audio playback.

So why bother with a Discman? Well, it's got uncompressed CD quality audio (which you can't always take for granted these days). And it's very portable. You just have to pack a few CDs to go along with it.
Whenever I have to spend many hours on an airplane while not being tasked with entertaining the kids, I bring the D-NE700 and a little book of copies of my favourite music.
Any feedback? Please use The Henry Audio Facebook page
Using the USB DAC 128 mkII with iPad and iPhone
Posted 2015-03-17
It's finally possible to enjoy your favourite music on an iPad or iPhone through the USB DAC. Here is an explanation on
what it takes to do this. You'll need a few cables but for the sound quality you get it's totally worth it!

Using a USB DAC became a possibility with iOS 7.1. It works very well. iOS doesn't perform sample rate conversion on the music. That's great news for anyone who cares about sound quality! The asynchronous USB
protocol is up and running. I have verified both with debug versions of the DAC firmware.
In order to get started you'll need to set up the following:
- Update your iPhone or iPad to the latest software.
- Buy Apple's "Lightning to USB Camera Adapter". (Or if you have an older device with a 30-pin connector, get the "Apple iPad Camera Connection Kit". That's the unplugged white rectangle on the picture.)
- Buy a powered USB hub. Pretty much any such hub will do. I've used the Belkin F4U038 for testing. The two black cables came in the box with the hub. You will also need a USB Mini-B cable for the DAC. (That's the grey cable on the pciture, the same cable as you'll need to connect the DAC to a Mac or a PC.) Both hub and cable must support USB 2.0.
- Use the grey USB Mini-B cable to connect the DAC to the hub. Power up the hub.
- The DAC needs to operate in USB Audio Class 2. A red front light and you're ready to go. If not, do as follows: Press and hold the rear Prog button until the front light goes red, and keep holding Prog until the front light goes dark. Then release Prog and click Reset. The DAC should now have a red front light.
- Plug the hub's input USB cable into the Camera Adapter or Camera Connection Kit. That's the black-to-white connection at the bottom of the picture.
- Plug the Camera Adapter or Camera Connection Kit into your iPad or iPhone. You typically don't get any messages or warnings at this stage.
- Slide up with one finger from the bottom of the screen. That should give you some audio options. Click AirPlay and make sure the Henry Audio USB DAC 128... is selected.
- Start your favourite music program with the DAC connected to your home stereo.
- If this doesn't all work the first time, don't despair. If all you get is silence, try to power off the iPad or iPhone and then power it on again. Do that without unplugging anything, and there's a fair chance you'll get that crisp good sound your music deserves.
Any feedback? Please use The Henry Audio Facebook page
High resolution audio on Windows - whys and hows
Posted 2015-01-18
Most audio consumer use a PC with a Windows operating system. That gives some obstacles and some opportunities. This topic is complicated! Bare with me and I'll
try to guide you through this confusing landscape.
Audio can be sent from a computer to a USB DAC using - obviously - a USB cable. The communication protocol used for that digital audio comes in two flavors: USB
Audio Class 1 and 2. (Commonly abbreviated UAC1 and UAC2.) Both are capable of carrying high-quality (better than CD) audio signals to the DAC. But if you want
really high resolution, only UAC2 will do. If you have heard of USB 1.1 and USB 2.0, that's good. USB 1.1 is typically used to carry UAC1 signals, and
USB 2.0 is used to carry UAC2 signals. There is very little need for USB 3.0 in audio applications.
If you didn't get that section, don't worry. Just make sure you use USB 2.0 cables.
A major obstacle is the lack of built-in support
for UAC2 in Windows. That means manufacturers of USB DACs must provide a driver for high-resolution audio playback. To make the Henry Audio USB DACs
work with hi-res audio on Windows, the ASIO driver is a required component.
Did I say obstacle? Actually, this is a major benefit! While the ASIO driver will only work with certain ASIO compliant player programs, it will not work with the
thing which goes "pling, you got mail". In fact, it bypasses all the "mixer tables" found in the internal audio signal path inside Windows. You'll be amazed at how
much audio processing actually takes place behind the scenes in a computer.
With a green front light, in UAC1 mode, the Henry Audio USB DACs will give you CD quality playback from any Windows program, including the "pling, you got mail". The audio
will pass through the internal mixers and sample rate converter (see 1st post at the bottom of this blog). But with a red front light, in UAC2 mode, the USB DAC
bypasses the entire internal audio processing. There is no mixing, no "pling..." and no sample rate conversion. It may not even show up as an audio device.
Still, this is what I recommend if you want to enjoy
ripped music or hi-res material.
Now, I understand it is inconvenient to switch back and forth between UAC1 and UAC2. There is actually a solution for that. It's called JRiver Media Center 20. This
is when things get a bit tricky. The JRMC installer will give your Windows computer a "virtual sound card". This is something the operating system believes is an
actual soundcard, so anything coming out of the internal Windows audio mixers (including "pling...") can be sent to that sound card. The brilliant stroke is
that whatever this virtual sound card picks up is sent to the Media Center program. And that program is connected to the DAC via the ASIO driver.
But when you decide to play an actual music file in JRMC, what it receives from the virtual sound card is thrown away. The net result is that you can play your hi-res
files from JRMC to the DAC without interruption, mixing and sample rate conversion. And whenever you're not playing those files, sounds from all other Windows programs
are sent out instead. While this may sound complicated, installation and daily use aren't that hard.
This solution really does give the best of both worlds. There's a couple drawbacks, though. 1st, JRiver Media Center 20 costs $50. But you can try this stuff for free
before you decide to pay for it. The other drawback is that sending the audio signal back and forth between programs does take its toll on the computer. All in all
it doesn't take up a lot of processor time, but it depends on the computer having a fast response time. You may hear small gaps in the music when large files or web sites
are opened. I guess JRiver are working to further improve on that.
If you decide to try this out, here are a few insider's tips:
- Familiarize yourself with how to change the Default Audio Device. Try this: Right-click the small bottom-right speaker icon next to the clock, left-click Playback devices, right-click JRiver Media Center 20, left-click Set as Default Device. Right-click it again and choose Set as Default Communication Device. This will send audio from other Windows programs to JRMC, so JRMC needs to run if you want to hear anything. There may be times when you want to change these settings for other audio devices, like when you're running the Henry Audio USB DAC in UAC1 mode. Beware that a lot of programs (like Skype) have their own audio device selection tools.
- Then set JRMC's sample rate to that of CDs. Most of what you're listening to in other Windows programs will have come from a CD. Again, see the 1st blog post at the bottom of this page. Right-click the small bottom-right speaker icon next to the clock, left-click Playback devices, right-click JRiver Media Center 20, left-click Properties, left-click Advanced, pull down to 24 bit, 44100 Hz (Studio Quality), left-click OK.
- In JRMC select the Audio Device. This is something you must do after having installed the Henry Audio USB DAC and its ASIO driver. And flipped it to red front light / UAC2. In JRMC click on the icon which shows three horizontal bars with dots on them. (Or click Tools, Options.) Then select the blue note icon for Audio on the top-left. In the Audio Device pull-down menu choose ASIO UAC2. Click OK.
- JRMC may need a lot of CPU resources. I recommend you give it that. Click Ctrl-Alt-Del and Start Task Manager. In the Applications tab right-click on JRiver Media Center 20 and then left-click on Go To Process. In the Processes tab right-click on Media Center 20.exe and left-click on Set Priority and change it to High. (If you can't select Media Center 20.exe in the Processes tab, try to first sort by name by left-clicking Image Name and then repeat the process.) This is something you should do each time JRMC is started. There are programs which will automate that, but I'm not going into those for now.
Any feedback? Please use The Henry Audio Facebook page
Sampling theory and Western movies
Posted 2015-01-05
With Christmas celebration and a flue hopefully behind me it's time for one of my favourite topics. What is sampling theory, or why do the
wheels behave strangely in old Western movies?
Let's start out with one of these:

In a movie, the settlers come under attack and flee in their wagons. Where you sit in the cinema the wagon wheels seem to spin forward, backward, stand still and do other weird things. The reason
is that as the wagon speeds up the wheels start to move too fast for the frame rate of the camera. This is very relevant for digital audio as well!
Movie cameras capture 24 frames each second. Each frame is a still picture. When played back at the same rate, our eyes percieve the rapid succession of stills
as movement. For simplicity, let's assume a wagon wheel has 12 spokes.
Obviously, with the wagon standing still, each frame will show the same position of the spokes. As the wagon starts to move slowly, however, each new frame will show a wheel
which has turned a little bit. That's shown at the top of the figure below. The wagon is moving to the left, and the wheels rotate faster and faster anti-clockwise.
After a short while, the wheel turns at exactly one round per second. That is 12 spokes per second, or 1/2 spoke per captured still. At this speed, every other frame
has a spoke standing straight up, and the wheels turn into a blinking blur. Up to this speed, the accelerating wagon looks like it has wheels which spin faster and faster
to the left. But as the speed goes up from 1/2 spoke per still picture on the film, the accelerating wagon will actually look like it has wheels which go from a blur
and to a slower and slower reverse spin! That is shown on the third line of wheels below.
At a speed which is higher still the wheel will turn at two rounds per second, or exactly one spoke per captured still. That's when the wheel will look like it is
standing still. And with a slightly higher wagon speed it will again look like the wheel is rolling forward. Eventually, the wheels will becomme more and more blurry
regardless of the speed. That is because it does take a little bit of time to capture a still image, and the spoke will move during that period.

How can this possibly relate to digital audio? The sample rate of movies is 24 still pictures per second (with some modern exceptions). The sample rate of a CD is
44100 samples per second. The analogy of how many spokes pass per still picture is comparable to how many periods of an audio signal pass between each sample.
Like a slowly moving wheel, a low-frequency bass signal is easy to capture and reproduce. The highest possible frequency which can be sampled is comparabel to
the wheel passing 1/2 spokes per frame. In audio terms, that is equivalent to a sound pressure peak in one sample and a sound pressure trough in the next. With a
sample rate of 44100 samples per second, that occurs at exactly 22.05kHz. But this signal will be sampled in a blurry way. This is why we say the CD format can
store frequencies up to 20kHz. The half-sample-rate frequency is known as the Nyquist frequency, named after Harry Nyquist.
And just like faster moving wheels will look like wheels going in reverse or standing still, any signal above 22.05kHz must be removed before the audio signal is
sampled. Without such filtering sounds from the microphone coming in at 44.10-20.00=24.10kHz will be added to the notes coming in at 20.00kHz. Likewise, signals
at 44.10-0.00kHz will be added to the original DC signal during sampling. This phenomenon is called folding or aliasing. Anti-aliasing is also empolyed when images are sampled
onto pixels in the 2D domain, but that's another story.
Some believe humans can't percieve frequencies above the 22.05kHz limit, while others find great joy in listening to hi-res formats which can store higher frequencies.
Any feedback? Please use The Henry Audio Facebook page
Samples and thermometers
Posted 2014-12-04
I promised a few words on sampling. It'll be more than a few! This is the first part. In digital audio sampling is essential. An analog-to-digital converter will
sample the music coming in from a microphone or another analog - real life - source. To sample means to make a
snapshot. Before I go into sampling music, let's discuss something everybody can relate to, a thermometer.
The snapshot is an analog value collected at a single point in time. You can imagine it like casting a quick look at
the colored fluid level inside a thermometer. The fluid level will go up or down depending on temperature, but it is usually too
slow to see the change with the naked eye.
This fluid level is an analog value. It can go up or down microscopically. A digital thermometer can't. There
the temperature is shown not as a fluid level but is rather rounded off to a number corresponding, typically, to the nearest half degree.
The digital thermomenter then has a quantization step of 0.5 degrees. So if the analog thermometer's fluid level is just above
22 degrees, the digital thermometer rounds it off to 22. If it's just below or above 22.5 degrees, it's rounded off to 22.5. If the fluid level corresponds to
22.25 degrees, it's anybody's guess if it's rounded off to 22.0 or 22.5.
Most digital thermometers are designed with a fine enough resolution
that the users don't care about it occationally being off by just a little bit. In digital signal conditioning we say that the
quantization error is +/- half a quantization step. There are cases when the quantization error can be detrimental to system performance. One such
event inspired the previouos name under which my USB DACs were sold, QNKTC - Quantization Noise Killed The Cat.
Both your analog thermometer and the digital one have dynamic range. Dynamic range is the difference between the highest temperature and
the lowest temperature the thermometer can deal with. You have probably seen a medical thermometer with a small range of
temperatures. It only cares about those temperatures interesting to a physician. But it does so in fine detail. Outside your house your wall mounted
thermometer has a larger range of temperatures and less detail. In Norway and other cold countries it is possible to destructively experience the dynamic range of some analog
thermometers. At -39 degrees C mercury freezes and the glass in the thermometer breaks.
A digital thermometer has similar dynamic range. It will hopefully not break apart in low temperatures. But its display will always have a lower and an upper bound.
A display with 2 digits and +/- will be able to show you temperatures from -99 to +99. With 3 digits it can show either -999 to +999 or -99.9 to +99.9.
So with a given numerical format (here: digits on the display) there is the choice between dynamic range and resolution.
Inside the digital thermometer, the quantized (rounded off to nearest number) samples are stored in digital "words" with a number of bits. Both -999 through +999 and
-99.9 through +99.9 require the same number of bits, 11. (In fact, with 11 bits you can store any integer from -1024 through +1023.)
I said initially that samples are made from snapshots. Digital samples are quantized snapshots. Those have fixed resolution and dynamic range. There is also the
element of sampling rate. That is how often a sample is made. Just like the designers of equipment consider the dynamic range and resolution needed by the end user,
the sample rate too is important. With a digital thermometer, sampling every few seconds is more than fast enough. If the sampling rate is 1Hz, the sampling period is 1s.
Similarly, a sampling rate of 10Hz gives a sampling period of 0.1Hz.
In the next blog post I will write more about sampling periods and how they relate to a special periodic phenomenon everybody has seen.
Cheers,
Børge
Any feedback? Please use The Henry Audio Facebook page
Sample Rate Conversion
Posted 2014-11-16
Every user of computer based audio playback should know a little bit about sample rate conversion.
Some of you have probably tried to play an LP on 45rpm and experienced the effects. (If you haven't,
what happens is this: audio recorded for 33 rounds-per-minute will be played back at 45/33 the speed,
something which will increase the speed and pitch by 36.4% or 5.4 semi notes. It will also confuse the RIAA
filter of your amplifier, but that's another story.)
Countrary to LPs, digital audio is made up from samples. I'll get back to you with more information on sampling
later. For now, suffice to say samples don't vary smoothly, they are instead discrete events in time. Much like the dots
in a connect-the-dots puzzle are discrete points on a sheet of paper.
Digital sample rate conversion actually preserves both the speed and the pitch of the music while the
actual playback in the DAC is taking place faster. To do that it will take the original sequence of samples and make a
new one which fits the faster playback rate. Or with the LP analogy, locally fill in pieces of vinyl in the part of
the too-fast-moving LP directly underneath the pick-up.
Digital audio technology isn't really that intuitive. Let me try to come up with a better example of sample
rate conversion. Imagine you want to show a child a connect-the-dots puzzle. The original puzzle has 44.1
dots per foot. In your opinion, this is too hard a task for the child, so you first solve the puzzle for her. Then you take
a piece of translucent paper and put it on top of your smooth, continuous drawing. And on the translucent paper you draw
a set of new dots, this time at 48 dots per foot, and hand it to the child to solve. So the dots are a bit tighter, but no longer in
the exact same place. To you the puzzle now feels easier to solve.
Sounds like a pointless process? It is! And your computer does this to your music. It does it regardless of which DAC
solution you use.
The solver (both adult and child) will probably be familiar with the subject
in the puzzle, and draw sharp corners and smooth lines where they belong. But with the new (sample rate converted)
set of dots, the dots have moved and it's harder to know where those sharp corners are. When a computer performs sample
rate conversion it has no knowledge of what the picture actually contains. Instead it uses a fixed digital filter which
will color your music.
There are a few ways to disable sample rate conversion. Often, your operating system does it without asking you. It simply
converts everything to the highest sample rate accepted by your DAC. In Windows you should use an ASIO player or select
Exclusive Wasapi Event Style for the audio protocol. If those confuse you, look up the Advanced Properties of your DAC
and fix the sample rate to 44.1, the most commonly used sample rate for audio. On a Mac you can do the same thing
in the Audio/MIDI control panel. On Linux your mpd.conf file should include auto_resample "no".
To sum this up: Sample rate conversion happens everywhere, on almost all digital playback hardware. It is not a
disasterous thing, but it will modify your music by not giving the DAC the original samples from the player software.
Be aware of this and explore the options in your player and and operating system. More likely than not it will sound better.
Cheers,
Børge
Any feedback? Please use The Henry Audio Facebook page